Guides
Harvest and condition cut flowers: a crew workflow
Harvest and condition cut flowers with a 14-step crew workflow: order check, clean buckets, solution records, lot labels, cooling, grading, and a vase test.
This guide walks a farm crew through how to harvest and condition cut flowers in a repeatable 14-step field-to-cooler workflow, from order check to vase test. Each step is a teach point: what to prepare, what to check, and what to record.
What to take away
- Train the crew on all 14 steps before the first harvest, not during it.
- Every bucket carries field, crop, cultivar, date, and treatment identity from the first cut.
- Solution mixing is recordedproduct, water volume, concentration, preparer, and time.
- The cooler is checked against the crop card, not against one farm-wide set point.
- Vase tests are run per lot, and results feed back into the next crop card.
This workflow is built for a farm crew that harvests and conditions cut flowers in one pass. It follows the common wet-handling path: cut stems go straight into clean water or a mixed solution. If a crop needs dry harvest, hot-water treatment, or another exception, write that on the crop card and train it as a separate drill.
Step 1: confirm the order and crop card
Count required bunches, stems per bunch, grades, colors, and delivery time. Review the crop's harvest stage, cut location, solution, storage temperature, and sensitivities. The crew lead signs the harvest card before cutting starts.
Order and crop card check
- Count required bunches and stems per bunch
- Confirm grades, colors, delivery time
- Review harvest stage and cut location
- Review solution and storage temperature
- Note crop sensitivities
- Add trial photograph if stage vague
If the stage description is vague, add a photograph from the farm's own trial. "Ready" is not a repeatable grade.
Step 2: prepare the handling area
Clear the receiving table and floor. Confirm shade, drainage, lighting, handwashing, and waste containers. Make sure the cooler has enough open space and that air can circulate around the incoming load. Walk the crew through the layout so everyone knows where full buckets go.
Read the cooler temperature log and verify the thermometer. A set point does not prove the product zone is at that temperature.
Step 3: wash and sanitize equipment
Use the operation's written procedure for buckets, knives, snips, tables, and carts. Follow product concentration, contact time, rinsing, and worker-protection directions. Keep dirty returns separate from clean equipment. Train new crew on bucket inspection before they handle flowers.
Inspect bucket interiors for biofilm, cracks, and residues. Retire containers that cannot be cleaned.
Step 4: mix the assigned solution
Use measured water volume and a commercial floral preservative such as Chrysal or Floralife. Mix with lukewarm water unless the label says otherwise. Record water source, product name, concentration, preparation time, and preparer. These products are buffered for cut flowers; check pH only if the label or crop card calls for it.
Make enough solution for the estimated stems plus a controlled reserve. Too little leads to crowded buckets; too much becomes waste and disposal work.
Step 5: label the bucket
Attach field, bed, crop, cultivar, date, succession, and intended treatment. A bucket without identity should not enter the cooler and rely on memory later. The crew lead spot-checks labels at the cooler door.
Use a waterproof method that remains legible through condensation and handling.
Step 6: harvest at the specified maturity
Inspect several plants before cutting the row. Remove diseased, insect-damaged, bent, or overmature stems according to the grade plan. Cut with a sharp tool without crushing vascular tissue. Show the crew a photographed standard so everyone cuts the same stage.
Iowa State University Extension's guide How to Harvest, Condition, and Care for Cut Flowers recommends clean sharp tools, species-specific maturity, cool morning harvest, rapid placement in water, cool storage, and commercial floral preservative rather than household recipes.
Step 7: protect stems in the field
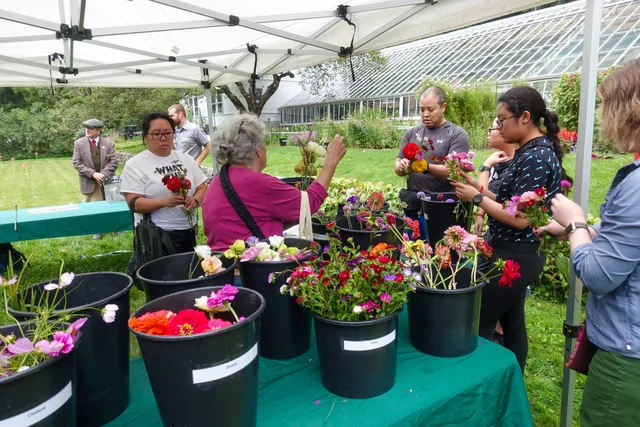
Place stems into the assigned solution promptly, keeping flowers above the water line. Do not overfill buckets. Move filled containers to shade rather than completing the whole bed first. Train the crew to move buckets as they fill, not at the end of the row.
Keep wet flowers from being crushed together. If dew or rain remains on blooms, follow the crop's drying and disease-prevention protocol before close packing. Where wet blooms are chronic, rain-excluding structures earn consideration for exactly this reason.
Step 8: transfer to the handling area
Use a cart or vehicle that keeps buckets upright and shaded. Shorten the interval between cut and cooling. Record start and finish time for large harvests so delays become visible. Assign a runner to keep the field-to-cooler interval short.
Avoid exhaust, direct sun, hot pavement, and unnecessary vibration.
Step 9: strip and recut only as specified
Remove leaves that will remain below the solution line. Retain enough upper foliage for appearance and crop function. Recut stems when the protocol calls for it, using clean tools and a consistent amount. Show the crew where the solution line should sit on each crop.
Do not split or crush woody stems as a universal practice. Use the species method that vase tests support.
Step 10: condition
Place stems at the specified depth in lukewarm solution. Most crops condition overnight or for the hours stated on the crop card; keep different treatments separate. Prevent petals and foliage from falling into solutions.
Mark the bucket's conditioning start. When conditioning is complete, move it to grading or storage rather than leaving an unknown lot overnight.
Step 11: cool
Space buckets so cold air can reach them. Temperate flowers want the coldest safe setting, while tropicals need a warmer zone; keep them separate. Avoid blocking evaporator discharge or loading warm product tightly against already cooled flowers. Monitor air and, when practical, representative stem or water temperature.
Protect chilling-sensitive crops in their own range. Keep ethylene-producing produce and combustion sources away from sensitive flowers.
Step 12: grade and bunch
Sort for stem length, straightness, maturity, bloom size, foliage, and damage. Count stems. Use bands or ties that hold the bunch without cutting tissue. Train the crew to call out cull reasons as they sort.
Record culls by reason. "Waste" hides whether the crop was overmature, short, bent, diseased, or damaged during handling.
Step 13: pack and dispatch
Use sleeves, buckets, or boxes designed for the route and buyer. Prevent flower heads from rubbing. Label every sales unit and maintain the required temperature during loading and transport. Train the crew on label placement so every unit can be traced back to its bucket.
Record delivery time and buyer rejection or adjustment.
Step 14: run a vase test
Take random stems from the lot before sale. Use one clean vase, solution, room, light, and evaluation method. Record opening, bent neck, petal drop, water clarity, and end of acceptable display. Train one person to run the vase test the same way each week.
Keep the benchmark crop-specific. Michigan State University Extension's Garden Flowers for Cutting, Part 1 notes that vase life is a crop trait: peony may hold only a few days, while marigold can last two weeks. One universal day count misjudges both.
Crop card examples
Write the crop card once, then train from it. These examples show the kind of detail that keeps a crew consistent.
- Zinnia:Harvest when the flower is fully open. Remove lower leaves and condition in lukewarm water with preservative. Zinnias wilt quickly if left dry, so move them into solution within minutes of cutting.
- Sunflower:Cut when the first petals lift from the center, before the flower is fully open. Strip most leaves and condition in shallow water. Heavy heads need support in the bucket.
- Peony:For storage or transport, cut at the soft bud stage when the bud gives slightly. For same-day sale, a partially open flower is acceptable. Expect a short vase life once fully open.
- Marigold:Cut fully open. Condition in clean water with preservative. Marigolds can hold for two weeks, making them a reliable market flower.
Common questions
Should stems be recut underwater?
Some guidance recommends it for particular situations, but it may not be practical at scale. Use the crop protocol and test the result.
What water temperature should buckets contain?
Use lukewarm water for most crops unless the crop card says otherwise. Tropicals and some species are the exception; follow the label or species direction.
May several cultivars share one bucket?
Only if treatment, identity, and grade remain clear. Separate lots make records and problem diagnosis stronger.
When should lower leaves be removed?
Remove foliage that would stay in solution, at the stage that minimizes field time and stem injury for the crop.